Software development
On week 2, I am doing my coding for ultrasonic sensor. This automatic whiteboard cleaner are using
ultrasonic sensor as the obstacle
avoiding system on the whiteboard. The whiteboard will be mount with an obstacle at the border
of the whiteboard that act as the obstacle for the system.
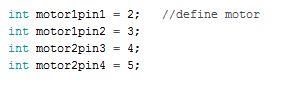
The ‘int’ in this program are used to declare multiple
variables at once in c language. In
this project, it is used to declare the trigger pin and the echo pin of the ultrasonic sensor. The trigger
pin at the ultrasonic sensor act as input
and echo pin are use as the output pin. The program used ‘int’ because it takes
less space than the others.
‘long’ are used in this program because it can store up to
64-bit signed integer. The long in
this program are used to calculate the duration and distance for the ultrasonic sensor. The distance are calculate
by using this formula; Distance = Speed x Time.
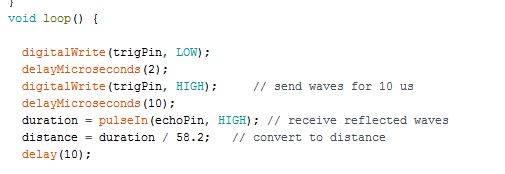
Based on figure above, it shown the
loop program for the ultrasonic sensor. Loop program are important to make sure it keep moving until
the user stop the program
by the switch. When the ultrasonic sensor did not detect any obstacle
in front of it the input will remain at the low state. When the sensor detect the obstacle
the input will be high and it will send the input to the controller and the output will also be high state. The distance will be calculate before the output become high.
Figure show how to control the program by using the if and else condition. In this figure it is show that
if the distance of the ultrasonic sensor is more than 19, it will keep moving
forward until it met any obstacle in front of the sensor. it shows the condition and the decision
if the distance of the ultrasonic
sensor is less than 18. When the distance is less than 18, that’s mean the input of the sensor is
high. The sensor are detecting the obstacle
in front of it and make decision to move backward and move to another
side of the whiteboard.