Pages

WEEK 12 FYP2


TROUBLESHOOT PROBLEM

In this week, when i want to test again the project prototype, the motor does not moving. I run troubleshoot for all components but all the components is functional well. I decide to change the battery and the motor start moving but slowly.

    I make decision to do more research about the components and focus more at the motor driver. What i get from the research is, the motor driver need more than 10V supply to run 2 DC motor. I try to use two pieces of 9V battery at my prototype and the motor started to move faster. This week i manage to troubleshoot the problem why my motor driver did not run at high speed, it is because the motor driver did not get enough supply.

0

WEEK 11 FYP2


Troubleshoot for ultrasonic sensor

    In this week, I am deciding to make improvement for my prototype. For ultrasonic sensor i am deciding to make it sense obstacle at 18cm far. This value is a good value because when the sensor detect the obstacle in front of it, the controller can send data to motor driver to decide where to move next. so, the 18cm is a good distance to stop and avoid any collision of the prototype and the obstacle in front of it. 

    if the sensor detect more than 18cm than it is means the obstacle is far with the prototype.

0

WEEK 10 FYP2


SUBMIT DRAFT

    In week 10, I am submitting my draft report for Chapter 5 to my supervisor for him to check my progress. In this chapter the discussion of the finding will be discussed in this  chapter. As we know, cleaning the whiteboard sometimes can take a lot of teaching time. In addition, cleaning the whiteboard manually will also require a lot of human energy more over if the size of the whiteboard are bigger it also take both of the time and the human energy at the same time.

    In this chapter I need to provide few recommendation for my project and do comclusion from what i get by doing this project. 

0

WEEK 9 FYP2

SET THRESHOLD

during this week, i am doing my research how to set threshold for black marker pen colour. In order to make the colour sensor work for the automatic whiteboard cleaner, the threshold for each colour must be set. To set the threshold, each colour must be tested by using TCS3200.  

    To complete this automatic whiteboard cleaner project, the sensor are going to detect the black colour since the black marker pen are commonly used by the teachers. To detect the black colour, the sensor need to recognize the black colour first by place the sensor at black surface. The sensor are place for a few second on the black surface to determine the threshold.


0

WEEK 8 FYP2


Submitting Draft

    In week 8, i am completing my Chapter 4 thesis draft to my supervisor for him to check so that i can do a correction if I got mistake in my report writing. In this chapter, there are several aspects that have been considered in the making of the automatic whiteboard cleaner. The Ultrasonic Sensor from our prototype detect the obstacle in front of it and the Colour Sensor is to detect the ink residue on the whiteboard and send the input to the microcontroller (Arduino Nano) then the data are sending the signal to the motor driver. The expected result of this project are in this chapter.

0

WEEK 7 FYP2


TROUBLESHOOT MOTOR DRIVER

    In week 17, the motor driver at my prototype did not turn on. i have check the connection on the stripboard and all the connection are okay. I run a few test at all the components and turn out the motor driver are actually broken.

    i have decided to change the motor driver to a new motor driver and the new motor driver are turn on and can run the prototype. 

    figure above show the motor driver thati use to run my prototype.


0

WEEK 6 FYP2

Experimental Prototype

 In week 6, after I completing my hardware prototype I am doing my testing for my prototype. The prototype on the whiteboard with the size of the whiteboard is 20inches long and 20inches width. The prototype of this whiteboard cleaner are being tested on this whiteboard. 3 Figure below shows the prototype that being tested on this whiteboard.


    The whiteboard are clean after testing the automatic whiteboard cleaner prototype. This prototype only takes around 10seconds to clean the marker stains on the whiteboard.


0

WEEK 5 FYP2


Hardware Development

    In week 5, I am developing the hardware already. The project are designed to make is friendly to the user and make it portable so that the teacher can bring this automatic whiteboard cleaner from class to another class. The design of this automatic whiteboard cleaner are the combination of Arduino Nano, ultrasonic sensor, colour sensor, motor driver and DC motor to make the whiteboard cleaner easy to move around the whiteboard.

    The prototype are attached to each other on the duster itself. This prototype are using battery as the power supply to move this automatic whiteboard cleaner and also to make it portable and wireless. The toggle switch are connected in series with the battery because it can be a semiconductor to the circuit. The switch are used to turn on and turn off the prototype.


0

WEEK 4 FYP2


Software Developement

In week 4, i am doing my coding for my colour sensor. Colour sensor are used to detect the remains stain at the whiteboard after the cleaning. The colour sensor are controlled by the arduino nano and give feedback to the motor driver to control the movement at the whiteboard.


    From Figure above , pin S0,S1,S2,S3 are defined as the output of the colour sensor and sensorOut is the input to detect any colour. S0 and S1 act as the output frequency scaling selection inputs and S2 and S3 as the selection input for photodiode type. The frequency scaling of the colour sensor are also set to 20%. This frequency-scaling feature optimizes the sensor's performance for different frequency counters or microcontrollers.


    Figure show the program to set the frequency scaling to detect black colour. The reason why to detect the black colour is because black colour marker pen are commonly used at the whiteboard. When the sensor detect the black colour, the reading of the black colour will be display at the serial monitor. The threshold for the black colour are determined from the reading at the serial monitor.


    The threshold for black colour is around the value 80 and 90. The relationship between colour sensor and motor is, if the reading is between 80 and 90 that is mean the colour sensor detect the dirt left on the whiteboard. The colour sensor will send input to the motor so that the motor will move forward and backward two times to make sure the whiteboard are cleaned.

0

WEEK 3 FYP2


Software Development

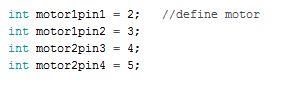
In week 3, I am doing my coding for my motor driver. motor driver are use to control the dc motor movement at the prototype. To move this automatic whiteboard cleaner, motor driver L298N are use with the DC motor. The motor driver are connected with the Arduino Nano in this project.


    Figure show the motor driver are connected to the arduino board. The first two line is to define port at arduino board for motor 1 and the other two line is to define pins for motor 2.


    From figure above, the motor was define as the output because for this automatic whiteboard cleaner the motor was declared as the output so that it can easily move around the whiteboard.

0

WEEK 2 FYP2


Software development

    On week 2, I am doing my coding for ultrasonic sensor. This automatic whiteboard cleaner are using ultrasonic sensor as the obstacle avoiding system on the whiteboard. The whiteboard will be mount with an obstacle at the border of the whiteboard that act as the obstacle for the system.


    The ‘int’ in this program are used to declare multiple variables at once in c language. In this project, it is used to declare the trigger pin and the echo pin of the ultrasonic sensor. The trigger pin at the ultrasonic sensor act as input and echo pin are use as the output pin. The program used ‘int’ because it takes less space than the others.


‘long’ are used in this program because it can store up to 64-bit signed integer. The long in this program are used to calculate the duration and distance for the ultrasonic sensor. The distance are calculate by using this formula; Distance = Speed x Time.


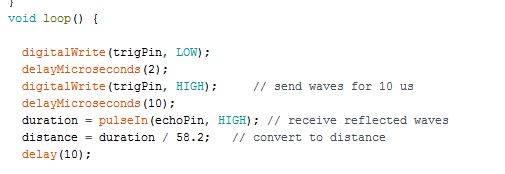
    Based on figure above, it shown the loop program for the ultrasonic sensor. Loop program are important to make sure it keep moving until the user stop the program by the switch. When the ultrasonic sensor did not detect any obstacle in front of it the input will remain at the low state. When the sensor detect the obstacle the input will be high and it will send the input to the controller and the output will also be high state. The distance will be calculate before the output become high.


Figure show how to control the program by using the if and else condition. In this figure it is show that if the distance of the ultrasonic sensor is more than 19, it will keep moving forward until it met any obstacle in front of the sensor. it shows the condition and the decision if the distance of the ultrasonic sensor is less than 18. When the distance is less than 18, that’s mean the input of the sensor is high. The sensor are detecting the obstacle in front of it and make decision to move backward and move to another side of the whiteboard.

0

WEEK 1 FYP2


Software designation in Arduino for each components

       Before starting doing the coding, I need to explore the Arduino IDE software because i never use the software before. I learn how to include components library into the software and realize that it is easy to use the software. 

        The language that will be use in the software is C-language. It make me learn more faster since i have the knowledge about the language that will be use.

    During week 1, I am researching about how to write code for each of my components. the components is ultrasonic sensor, colour sensor and motor driver. I need to calibrate each of the components and make sure the components are in good condition. 


0

WEEK 1


Researching the Proposal

During the first week, I am doing few research about some project. There are a few project that attract me to do but it is not related to my course. somehow I found the idea about making the automatic whiteboard cleaner that can be easier to the teacher to represent it to my supervisor.
0

WEEK 2


 Finding Supervisor


    In this week, I am looking for a supervisor for my project and I have met my supervisor. My supervisor name's is Dr. Ismail Bin Sulaiman. i have proposed the project idea which is to make Automatic Whiteboard Cleaner and my supervisor are agree with my project.

    My supervisor are asking me to do more research and read more article regarding my project. My supervisor also ask me to do a few literature review for my project so that I can improve my idea for this project.

    The purpose for my project is to design an automatic whiteboard cleaner which can reduce the user's effort and to fabricate a whiteboard cleaner which can be control automatically without physical interaction with the user. 


0

WEEK 3


 In this week 3, this week is the introductory FYP1 briefing from the speaker through Microsoft Teams channel. the briefing is about FYP1. 

    In this week also, i am still doing my research about my project to complete my literature review.

0

WEEK 4


 In this week 4, i am consulting with my supervisor to make my automatic whiteboard cleaner using ultrasonic sensor and colour sensor.

    The ultrasonic sensor are used to detect any obstacle at the whiteboard. Since the automatic whiteboard cleaner are moving automatically and freely on the whiteboard that are attached at the wall, an obstacle will be put together at the border of the whiteboard. The purpose of this barrier at the border of the whiteboard is to make sure the ultrasonic sensor can sense it and send the data to the controller to turn to another way.

    The color sensor are use to to detect the residue of ink at the whiteboard. when it detect the residue the data will be send to the controller, and from the data it will send to the motor driver.


0

WEEK 5


  This is the final week to register my FYP1 project tile. My supervisor and I has decide to put the project title to Automatic Whiteboard Cleaner using Ultrasonic Sensor and Color Sensor.
    In this week also, I have complete my Literature review which is Chapter 2 of my report. I submit my Chapter 2 draft to my supervisor and waiting his comment.
    From the literature review, what I can summarize is explained in the table.

NO.

TITLE

MATERIALS

DESCRIPTION

1.

Automatic Whiteboard Cleaner Using Microcontroller Based Rack And Pinion Mechanism

Arduino, driver module dc gear motor, rack and pinion mechanism, sonar sensor

      The used of sonar sensor is to calculate the distance of the sensor and reflecting object that mounted at brush.

      This automatic whiteboard cleaner will move across the board in forward and backward direction in order to clean the entire board.

2.

Design and fabrication of automated duster for cleaning of whiteboard

Rectifier, capacitor and transformer to make the white film rotate.

      The operation of this automatic whiteboard cleaner is the white film will rotate around the whiteboard in forward and backward direction when the start switch is pressed while the duster remain at the edge of the board.

3.

Design And Development Of Automatic Whiteboard Cleaner For Effective Cleaning Mechanism Using Arduino

Arduino UNO, dc gear motor, motor driver, four channel relay, duster holders, dusters rack and pinion and node MCU, mobile application (blynk).

      This project are using arduino for wireless control and it helps in quick process.

      The mobile application (blynk) is used to control the movement of the duster either move to the upper or lower part of the whiteboard or move to the right or left side.

4.

Automated Motorized Whiteboard

Flexible whiteboard

surface material, dusters, plastic rollers, motors.

      The whiteboard surface is flexible and by using the roller it rotate the whiteboard while the duster are fixed at the back of the whiteboard.

      When user switch on the power supply the motor start rotating the white sheets and the due to the friction the duster and the whiteboard, the whiteboard come out clean as the result.


0

copyright © . all rights reserved. designed by Color and Code

grid layout coding by helpblogger.com